Tag Archives: friends

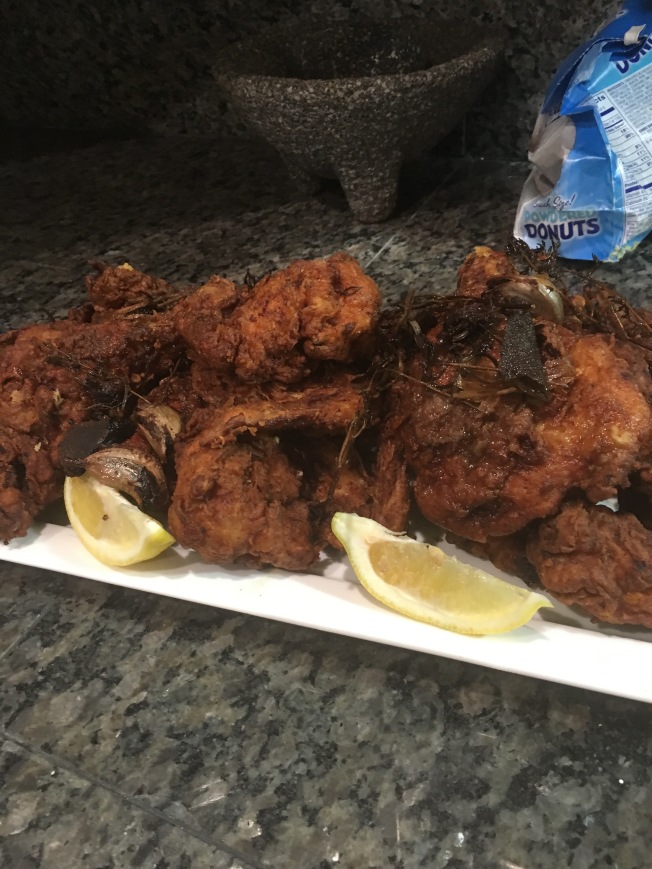
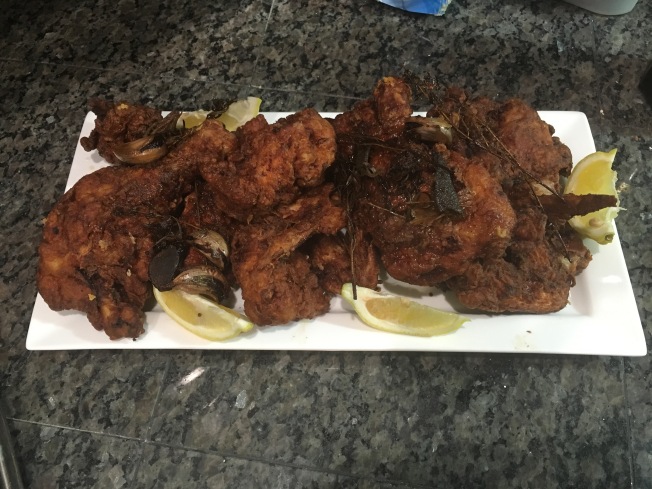
Herby-garlicky fried chicken

Standard

image

My first time making fried chicken. In the same way that people celebrate daughter’s first dance recital, graduations, sweet sixteens, and passing your drivers license tests, I feel like celebrating for my first fried chicken attempt. I’m thinking I should get a Colonel Sanders style sticker and a hug from Paula Deen.

I mostly feel accomplished because in true Katie-cooking-style, the production of this chicken started a week in advance, with me subtly mentioning “fried chicken on Sunday” to my boyfriend Spencer. TBH it was a conversation elongator where I thought about chicken and word vomited the preposterous idea of trying fried chicken for the first time for a crowd on Memorial Day weekend. I should really know my lesson by now that if I’ve skimmed a topic relating to food, someone is going to call me out on it if I don’t actually get around to making it.

Sunday rolls around and no preparations are in order, so I’m thinking I’m putting this adventure off for another time. Both Spencer and myself have moved into different houses, don’t know where anything is, and now we’re set on making fried chicken. It’s in these circumstances you realize that if you forget about the crowd and focus on the dish, things MAY ACTUALLY come together. Well, I wouldn’t say that’s always the case, but in this situation, the results were pretty good.

Before I know it, I’m driving back to St Charles where, of course, I’ve left the most random of kitchen accessories that happen to be needed for our recipe, large marinating plastic bags. In the rush of an unpacking afternoon, Spence was able to brine the chicken for ~3-4 hours before I took over the cooking. I tell you all this because if you’re not intimidated by the behind the scenes work to a barbeque or dinner party, maybe you’ll be more inclined to try something new for friends.

I think there’s a few camps when it comes to entertaining – on the one hand, if you try something new for a crowd, you’re overwhelmed by trying to master the recipe and entertain at the same time, but oftentimes in my case, the trying-something-new is part of the fun of the night. Somehow, it-all-comes-together-at-the-last-minute is the name of the game, like the orchestra started playing a little too early and the curtain guy is reeling up the curtain while the characters are still getting positioned on stage.

In this case, I started my part while Andrew and William were already working their magic with some delicious avocado mac ‘n’ cheese and a blackberry strawberry kale salad. With little kitchen space, the three of us managed a meal of epic proportions without any major accidents, burned food, or overcookery of sorts.

I saw this recipe on an amazing episode of the Barefoot Contessa where Ina invites Tyler Florence over. In one afternoon (yes this timeframe amazes me as well), Ina and Tyler make a wedding cake sized birthday cake, homemade fried chicken, and take a leisurely visit to the local Hamptons farm.

In the case that you watch this episode, I’ll give you a sense for what you actually might be able to accomplish based on my timeline . I’d say you may want to just focus on this fried chicken, as we had to take a bit of time brining the chicken, then prepping the chicken, then returning to the store to buy more oil for frying. I’m not sure when they made this birthday cake but luckily it came together in one afternoon! Whew, to be Ina!

Here’s a few things that differed in our rendition of this meal. 1) Lenzie and Trent brought those amazing fake-cakey cookies with the themed frosting instead of having cake, 2) We kept to their use of bone-in chicken except for the breasts which Spencer deboned , 3) there was no visit to the local farm and 4) instead of having Tyler Florence help guide the cooking process, I had 3 twenty-something guys and 2 parents all pitch in!

I’m hoping you’re not intimidated by Ina’s spotless white kitchen, always-plentiful bowl of silver spoons, and lively-never-droopy blue hydrangeas. Make this for your friends and family and watch their episode at the bottom of this post if you have 1.99 to spare 🙂

Here’s a little snap of our cooking adventure featuring the crew: Andrew, William & Robin; the last few seconds continues with our MDW braves game visit…we ate fried chicken before we went so its all relevant right??

Tyler Florence’s Fried Chicken, adapted very slightly, serves 8-9 comfortably with a few leftovers

2 3-4 lb whole chickens, breasts de-boned, all other pieces bone in (thighs + drumsticks + wings)

3 cups all purpose flour

2 TBS garlic powder

2 TBS onion powder

2 TBS sweet paprika (can use regular if you run out of sweet)

2 tsp cayenne pepper (Adjust here if you’re partial to less spicy)

4 cups (1 quart) buttermilk

2 TBS sriracha or other hot sauce you like

peanut oil or vegetable oil for frying (we used a mixture of both since I ran out of peanut oil…make sure to buy one of the big jugs at the store)

1/2 head garlic, smashed, husks still on (this is for frying dont worry about the husks)

1/4 bunch fresh sage

1/4 bunch fresh thyme

4 big sprigs of fresh rosemary

fresh black pepper and kosher salt

2 lemons, cut into wedges, for serving

  1. A few hours in advance, or the night before, set up your chicken to brine. We used a big tupperware, but you can use a large bowl. Cover the chicken with water 1-inch above chicken. Sprinkle 1 TBS kosher salt for every quart of water you’ve added. Cover with aluminum foil and refrigerate at least two hours, preferably overnight. This is what’s going to make the chicken really tender.
  2. When you’re ready to start cooking, take your chicken out of the fridge and let it come to room temperature while you prep the frying ingredients. In a shallow platter or deep tupperware in my case, mix together your flour, dry spices, and season with salt and pepper. We learned that you don’t need to add too much salt here, because your chicken already has a good bit of salt absorbed from the brining process.
  3. Pour oil into a heavy bottomed pot / Dutch oven, about 2/3 of the way full. Put your whole herbs and garlic directly into the cold oil . As these heat up, don’t worry about them burning, these whole spices are what will flavor your oil. Clip on your candy thermometer, ensuring that the bottoms of it isn’t touching the bottom of the pan. Heat stove to medium high heat, and start prepping your station as the oil heats to 350-375.
  4. Meanwhile, set your chicken to the far left, setting a plate next to the brine mixture where you want to dry the chicken before putting it into the buttermilk. Next set a shallow dish with your buttermilk and sriracha next to the chicken. Set flour mixture to the right of that, closest to the stove.
  5. Heat the oven to about 150,or whatever is its lowest setting. I wanted to do this to keep the chicken warm while other batches were still trying. **if your chicken is still a bit cold when you start frying, you may need a quick bake after frying to finish cooking your chicken. A few reviewers from Tyler’s original recipe noted this. Our chicken was at room temp so we didn’t have this issue and we only used the oven for warming.
  6. Set a sheet pan or 9×13 dish in the oven where you can set chicken after frying to keep warm
  7. As your oil heats up, start dredging process with a batch of two pieces. The first step is to dry the brined chicken off with paper towels. You need to do this to make sure the coating sticks properly. Next dip chicken pieces in buttermilk mixture, shake gently to remove any excess, and dredge in flour mixture. Press gently in flour to make sure you get all the crevices covered, then flip to the other side. You can leave chicken in this mixture before frying.
  8. Once oil is hot, gently place two pieces in the oil with tongs. Let chicken fry for 12 minutes per batch, moving around about halfway through to make sure nobody is stuck on the bottom of the pot.
  9. While you wait for one batch to fry, start prepping 2-3 more pieces. Also have at least 3 onlookers observe and ooh and aah over frying oil cauldron. Make yourself a yummy cocktail or mocktail
  10. After 12 minutes, use a meat thermometer to check for doneness if you have one. Chicken should be at 155 when it comes out, but will cook off a bit more than that after you take it off. Thank you Julie Mitchell for checking temp for me since we didn’t have a thermometer!!
  11. place done pieces in the oven covering with aluminum foil while you move on to the next batch
  12. After all the chicken is done, place on a plate and garnish with your fried herbs. Squeeze a few lemon wedges to taste and place a few other wedges on the side to garnish . Serve to hungry friends, and smile big after you savor each bite. 😀
image


White Chocolate Shortcake with Strawberries, Blueberries and Whipped Cream Frosting

Standard

2015-05-01 12.34.24

I’ve been perusing Etsy lately for new cannisters for my flour and sugar and then I started judging the cannisters based on how much rust they had on them. And then I got really self conscious thinking about the fact that I am searching the interweb for a vintage-y kitschy looking tin can and still considering purchasing it from those South Dakotans (yea that’s how you refer to them) who collect these things even though the can has RUST all over the inside of it. And then I took a deep breath and realized I had too much caffeine.

You know, when did the Container Store fall out of fashion and rusty South Dakota cans make a come-back?

Did you guys also love the Container Store circa 2006? It was absolutely the coolest thing to go and get rando trinkets and your day planner from there during summer break. Instead of buying those sleek Oxo bug-proof jars, I’m trying to find a jar with a print not as creepy as a gnome garden yet not as sleek as an Ikea esque white box. The things I do to procrastinate….

Speaking of flour and sugar….THIS CAKKEEEEE. If I had to describe a cake that would connect a wide variety of people’s sweet palettes, it would be this one. I am one to enjoy the most decadent of sweets, with cake layers full of butter and buttermilk topped with headache inducing frostings (and if you’re really lucky, two types of frosting and some kind of caramel brittley thing in the middle). On the other hand, there are those people born without a soul who like the “lighter” side of desserts.

Yes I am speaking to you, tart frozen yogurt lovers, sorbet-orderers, MERINGUE fans, and the worst – those who JUST SAY NO to dessert. This cake will woo even you!!

It’s a cake that is light enough to be dubbed a shortcake, yet dense and moist enough to satisfy the decadent sweets lovers like (hand-raised) me! There’s even some white chocolate chips snuck in there. The white chocolate gives the cake just enough sweetness that you don’t even notice that this frosting isn’t even really frosting at all. It’s whipped cream!

I made this for my office May cookout a few weeks ago with the help of my baking aficionado friend Tim. While I insisted it probably wasn’t the best idea to break into this cake before bringing it to the office, we made a mini version with the overflowing bowl of batter and made sure the recipe was legit. Here are my tips for assembling cakes after my cake-toppling incident a few years back:

Bake your cake layers the night before if you are gonna make this. Then wrap each one in plastic wrap and cover overnight. In the morning, transport the layers and frosting separately if you’re gonna have limited fridge space because this frosting isn’t the greatest for sitting out. Assemble the cake with the frosting and fruit right before eating!

For all of you who want the recipe – buy JoytheBaker’s Homemade Decadence book!!!

Creaming some butter and sugar (view the sweet potato blondies I also made below)

2015-04-30 19.45.272015-04-30 19.45.582015-04-30 21.19.02sawiinngg batta batta

2015-04-30 21.19.06Here are my tips on getting cake out of the pan. Take your spatula and point it straight down around the edge of the cake. Do this a few times until you know the cake is free from the edges. Then start to go down then under the cake and gently pull up slightly on the cake, but don’t actually try to take the whole thing out. Once you’ve primed the cake, place a plate over the cake and count your self down to a flip (I had Tim help with this). 1-2-3 flip!!! Then tap the bottom of the cake pan which is now facing up as you place the plate down on the counter. This will get any last bit of the cake out. Gently pull the pan up – and there ya go.

If you can feel that the cake didn’t in fact come out of the pan (gasp), just flip it over, look both ways to make sure no one saw you, and give it a few more minutes 🙂

2015-04-30 20.23.47

2015-04-30 20.32.03You know, just use a big pot to make your whipped cream when all your mixing bowls are taken….

2015-04-30 20.32.262015-04-30 20.32.47Watching this progression above, this is what happens when you don’t let your mini cake cool and just drop dollops of whipped cream on top :/

2015-05-01 08.48.07

I buckled it in shortly after. This is my recommended safety position for your cake.
2015-05-01 12.06.22Oh just assembling my cake at the office

2015-05-01 12.22.55Shoutout to my coworker Michael who helped put this together!!!

2015-05-01 12.34.29

ohhhhh yeaaaaaa

Challah, Challah Bill Y’all – A Judeo-Christian culinary experience

Standard

IMG_0011

About a month ago, my expert challah-making friend Kate (who has a laundry list of talents I might add), taught our group of friends how to make challah! In school, Kate made challah every week with an extracurricular group to raise money for hunger relief and let me tell you, it was the highlight of my week. My roommates in our sorority house NOMMED every week on one savory and one sweet loaf – usually some herby garlic, cinnamon raisin, or the cherished pumpkin chocolate chip (life will never be the same without you).

Bringing back the college memories and teaching us a little about Jewish traditions, Kate brought the dough and we contributed the toppings. I learned that in the Jewish tradition, you always bless the bread, hence, the importance of the challah. Shoutout to our snazziest consultant travelling visitor, Chandler who contributed most of these pics. While I didn’t actually make this dough, I can show you a bit about the process and how to get to the pretty part of the challah baking process 🙂

First, we rolled the dough (that had been rising for a few hours), into tiny balls that would later be rolled out

IMG_0001

Then, you take two dough balls for your little challah roll and roll them into long thin flat rectangles. This is where you’re going to create a bed for all the fillings. In the pockets, you want to OVERLOAD on ingredients. This is one thing I hadn’t thought of – but apparently when you’re adding filling to these, since the dough expands so much, you always want to put more filling than looks necessary.

In this instance, we made chocolate chip-PB, chocolate cinnamon, sundried tomato garlic basil, peanut butter nutella, and I think cinnamon sugar. Delicious!

IMG_0005

After you put the fillings in, you want to start tucking them in. There’s a sort of braiding going on where you tuck the right bottom corner to the left side of the dough and up. Then you go the opposite way and press into the dough to seal it. Do this until the filling is completely enclosed. The one below is sundried tomato, garlic, olive oil, and basil.

imagejpeg_2

imagejpeg_1IMG_0003Once everybody’s sealed up, you want to make an X with the two pieces of dough. Then, carefully wrap the two strands around each other, seal the ends together, and spiral to make a round loaf.

IMG_0008

IMG_0010

Place on a parchment paper-lined cookie sheet and bake at 350 for around 25-35 minutes – seems to be an art to this timing! Serve the savory ones with some yummy soup and have the sweet ones for dessert! Here’s to faith-sharing and food. Cheers 🙂

IMG_0011

Italian Sausage, Spinach, Tortellini Soup

Standard

2014-12-11 20.19.04

This recipe comes from my dear friend Edward’s mom and is your go-to recipe for cooking with men (boys). For our cooking date, I was gently steered towards not picking “any of that vegan stuff.” I must say it was a great choice for a cold night.

I especially appreciate cooking with people who find garlic to be as necessary of an influence on dishes as I do. While I wouldn’t suggest a high garlic factor recipe for a real date, in this case it was absolutely appropo. This recipe is great for a quick meal and involves little complication (you can’t mess it up that easily 🙂 )

Italian Sausage, Spinach, Tortellini Soup

serves 1 tall slightly Italian 20 something and 1 food blogger or 4 average eaters generously

2 (9 oz) packages of refrigerated cheese tortellini

3/4 lb sweet or hot Italian sausage

1 (14.5 oz) can of chicken broth (low sodium)

4 cups water

1 (10 oz) bag of frozen spinach, unthawed

1 (28 oz) can of Italian peeled tomatoes (can be chopped or whole)

1 can Ro-tel tomatoes

2-3 cloves garlic, minced

1 TBS italian seasoning (we used a combo of dried basil and oregano)

1. In a large dutch oven or soup pot, drizzle a tiny bit of olive oil and heat pan to medium. Break the sausages out of their casing and brown the sausage meat until slightly brown, breaking up the sausage with the back of your spoon.

2014-12-11 19.39.33

2. Add chicken broth and water and bring to a boil.

2014-12-11 19.39.50

2014-12-11 19.35.53

2014-12-11 19.35.57

IMG 3187 from thereshegoes35 on Vimeo.

Look at that stirring form, what a natural chef. We had a pump up playlist for this soup, naturally. Actually I think we just replayed the song in the vid over and over again. Oldie but a GOODIE.

3. Add spinach, seasonings, garlic, and both kinds of tomatoes, then bring to a boil for another 10 minutes.

4. Add in your tortellini and cook until pasta is cooked, about another 10-12 minutes.

5. Serve with parmesan if you have it and some vino.

Indian Mulligatawny Soup

Standard

2014-11-30 21.05.55

The inspiration for this soup comes from a lunch date I had about a year ago with a fierce friend of mine, the lovely Katherine Selko. Katherine, the biggest soup fan I’ve ever met, came to Atlanta on the dreariest day ever and lucky for her, the perfect day for soup.

We ventured to my favorite and maybe the only place I know of with good soup in ATL, Souperjenny. Mulligatawny happened to be the special that day, and I was so intrigued. Apples in soup?? Curry, lentils, potatoes, coconut milk, apples?? It was a combination of my favorite Indian curry recipes from home and some North African/Mediterranean spices. Needless to say, I’m sitting here all perplexed with the flavors and Katherine’s all – “Girl, you’re thinking way too much into this.”

A whole year later, I finally tried a mulligatawny recipe on a night when 1) I felt sick and therefore craved soup and 2) my roommate was out so I could make a mess with a billion spices. One thing I’m going to recommend is that you make this when you can actually smell (I had a cold and it kinda messed with my cooking mojo) because most importantly the flavors are intense and smell amazing. But also because if you burn your almonds/peanuts in the oven and maybe light them on fire accidentally you’ll actually be able to smell the smoke….just a tip.

Indian Mulligatawny soup, adapted very slightly from the Wanderlust Kitchen

1/4 cup butter (half a stick)

1 chopped yellow onion

1 carrot, chopped (I didn’t peel mine but you can, otherwise just give it a good scrub)

1 green jalapeno, seeded and diced

4 garlic cloves, minced

2 tsp peeled and minced/grated fresh ginger root

2 small Granny smith apples, peeled, cored, diced

1 can diced tomatoes (14.5 oz)

1 TBS curry powder

1 tsp cumin

1/2 tsp paprika

1/2 tsp cinnamon

1/2 tsp tumeric

1/4 tsp cardamom

1/4 tsp black pepper

1/2 tsp dried thyme

1/3 cup red or green lentils, dried

3 cups chicken broth (low sodium)

2/3 cup canned unsweetened coconut milk

1/2 cup chopped scallions

1/2 cup chopped cashews or almonds

1. Wow there are a lot of spices here but don’t worry. You’ve got time to prep them. Start by focusing on your basic veggies. Melt your butter on low heat in a large Dutch oven/soup pot. While the butter’s melting, chop up the jalapeno, carrot and onion. Drop those into the pot and let them saute until the onions are starting to look clear and add a pinch of salt and pepp.

2014-11-30 19.43.08

2. While the veggies are starting to soften, go ahead and grate or mince your ginger and garlic. Chop up the apples and open the can of tomatoes. After the veggies have soften slightly, maybe 5-7 minutes, add the ginger, garlic, apples and tomatoes.

2014-11-30 19.50.59

2014-11-30 19.56.44

3. Ok measure spices now!! Sometimes it’s easier to get a tiny bowl and measure out all your spices into it at once instead of having to scramble to add all the spices at the same time to the pot. If you’re going with the tiny bowl method, measure out the spices while the tomato mixture is bubbling and then add all the spices at once after about 3 minutes.

4. Add lentils and broth, give the pot a quick stir and bring the mixture to a boil. Turn the heat down to low and simmer uncovered for about 30 minutes – took more like 45 for me.

2014-11-30 20.05.58

2014-11-30 20.06.03

5. After 30-45 minutes, really you just want to make sure the lentils are cooked, puree about 50-75% of the mixture in a blender or food processor. This is completely dependent upon how chunky you like your soup. After you’ve pureed however much you like, add it all back into the pot and add the coconut milk and adjust the flavoring with salt and pepp.

2014-11-30 20.58.28

6. Serve with scallions and some chopped toasted almonds or cashews (I think a little toast brings out the flavors of nuts).

2014-11-30 21.05.33

7. Brag to your friends and make soups that they like so they come visit you in Atlanta!! (Katherine see you soon!!)