Author Archives: athaidek

Sriracha Honey Chicken Wings and Garlic Grilled Broccoli

Standard

2014-10-09 20.57.39

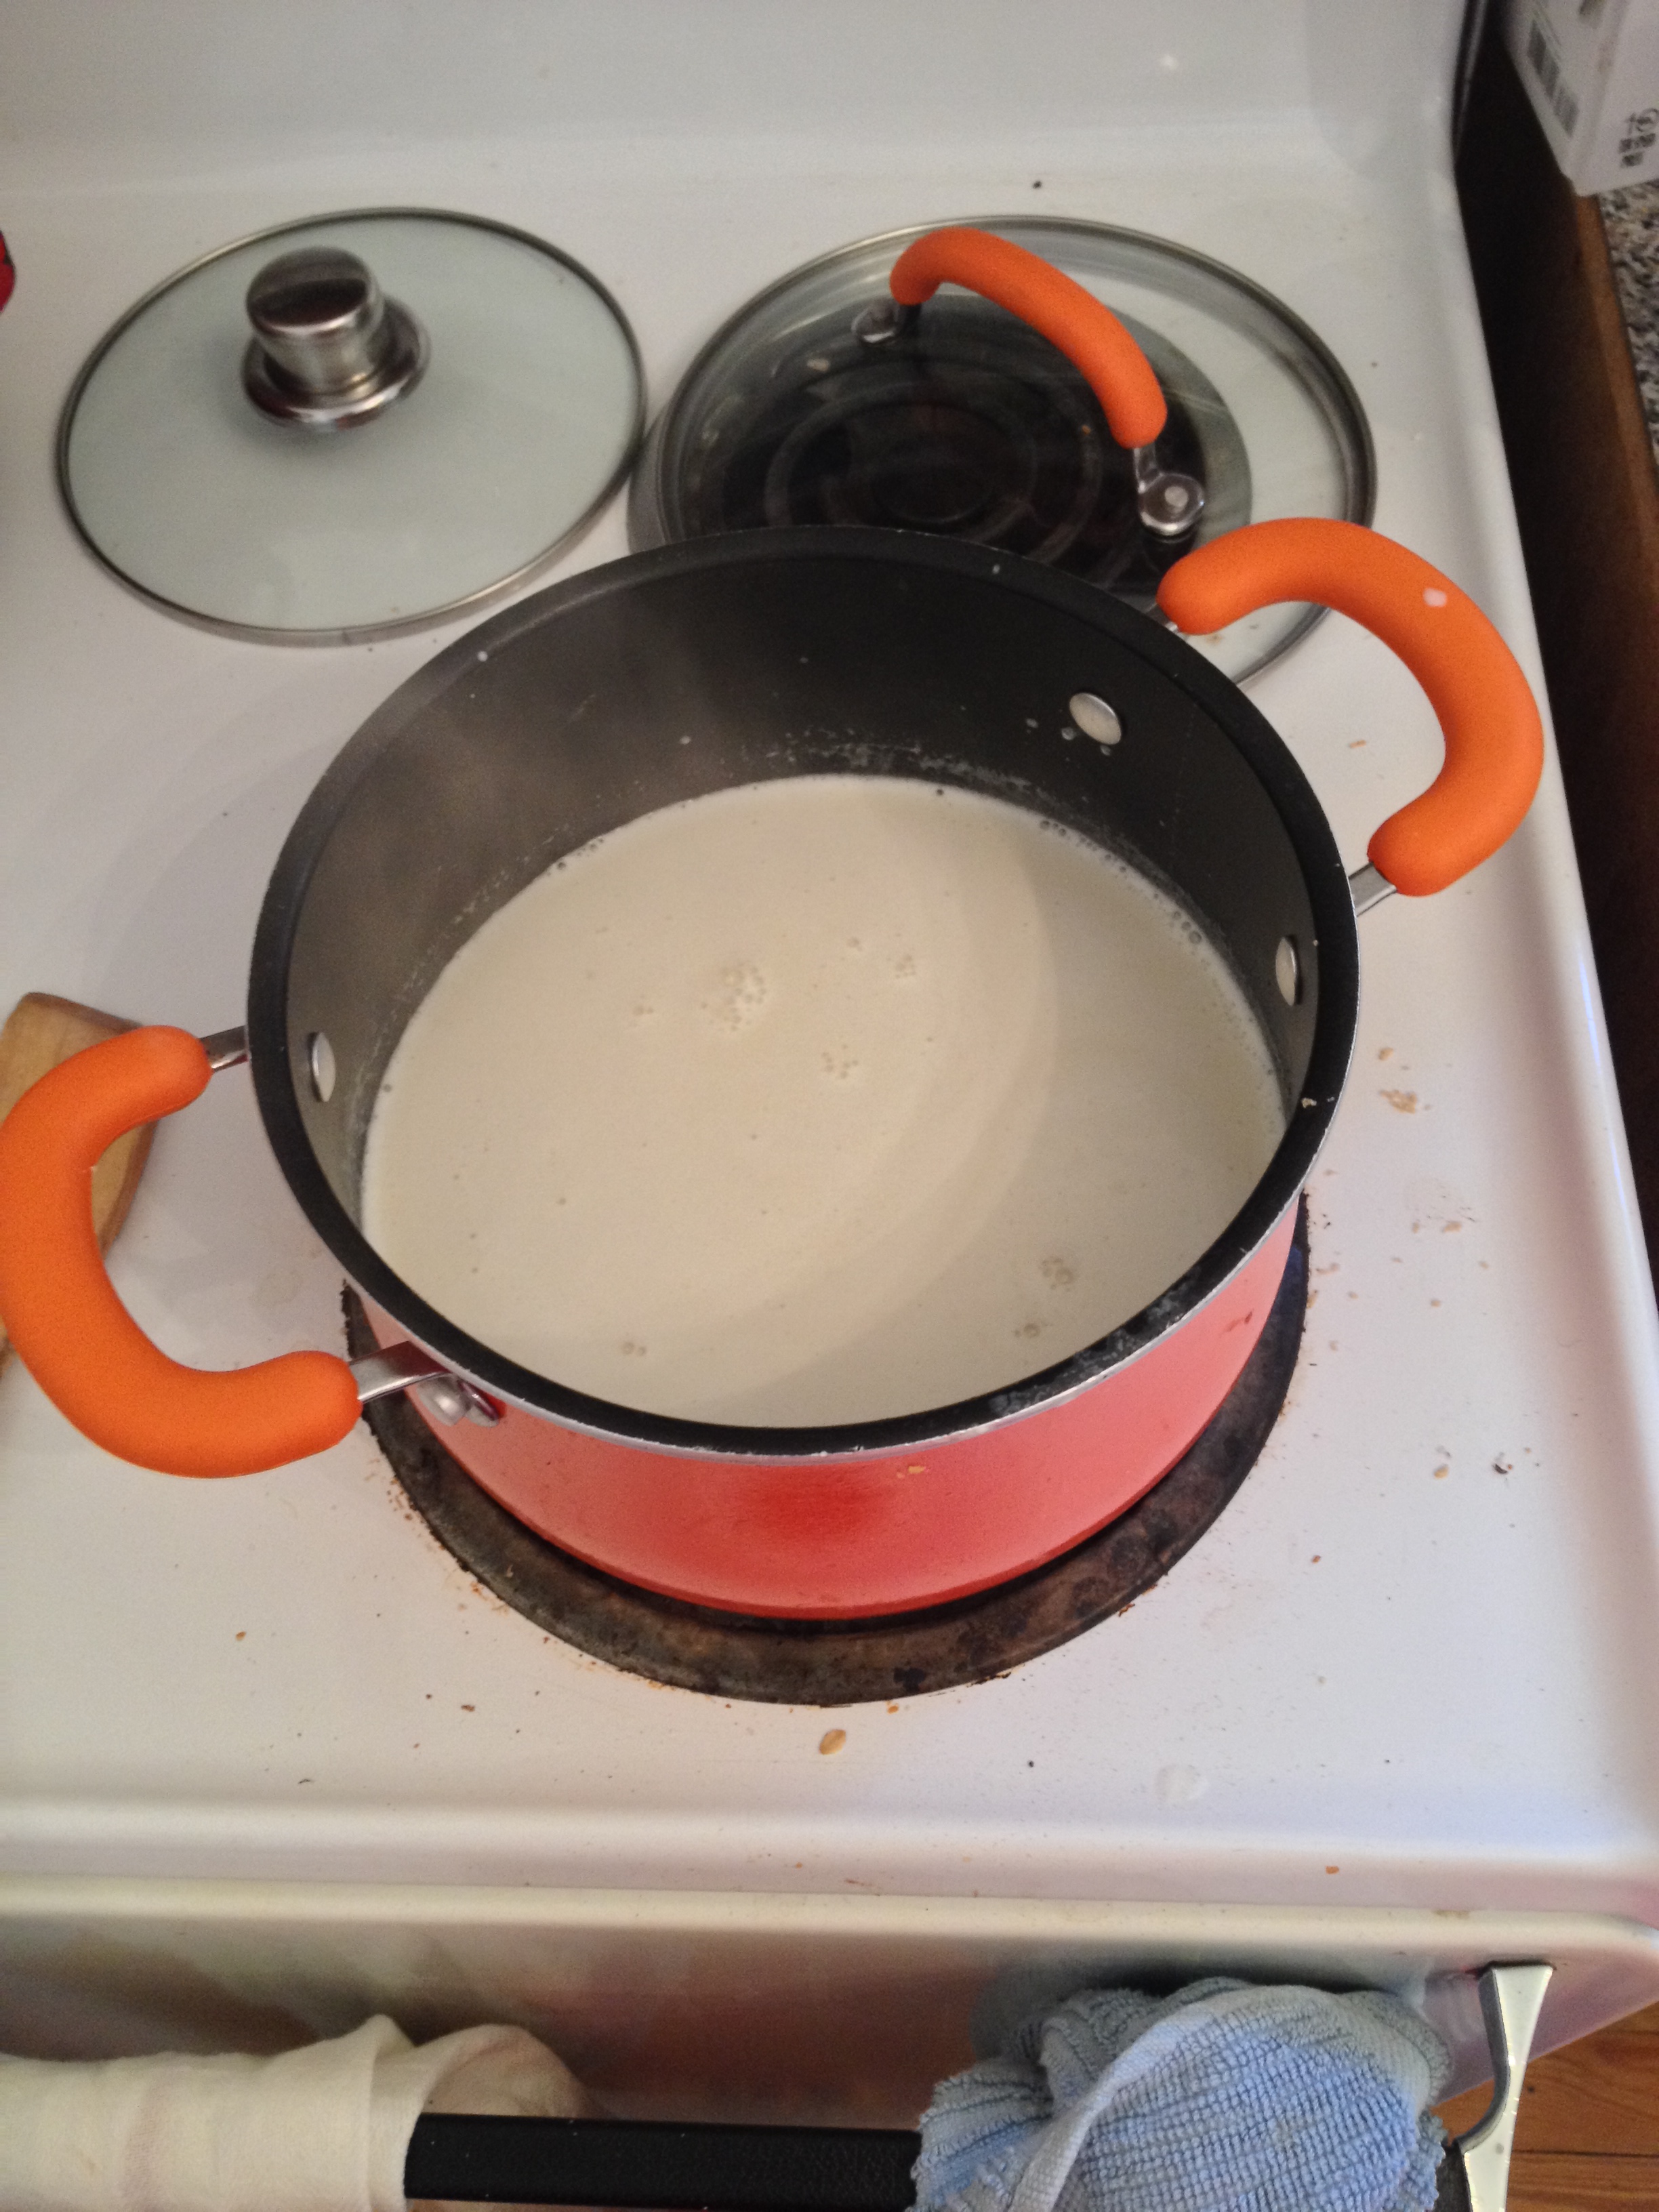
In college we used to go to this thing called Two times Tuesdays where you could get 2 for 1 wings. I’d like to formally and publicly apologize to Two times Tuesdays for not respecting the wonderful tradition of bone-in chicken wings. Yes, all, I am a boneless wings person. That is, until I tried these wings.

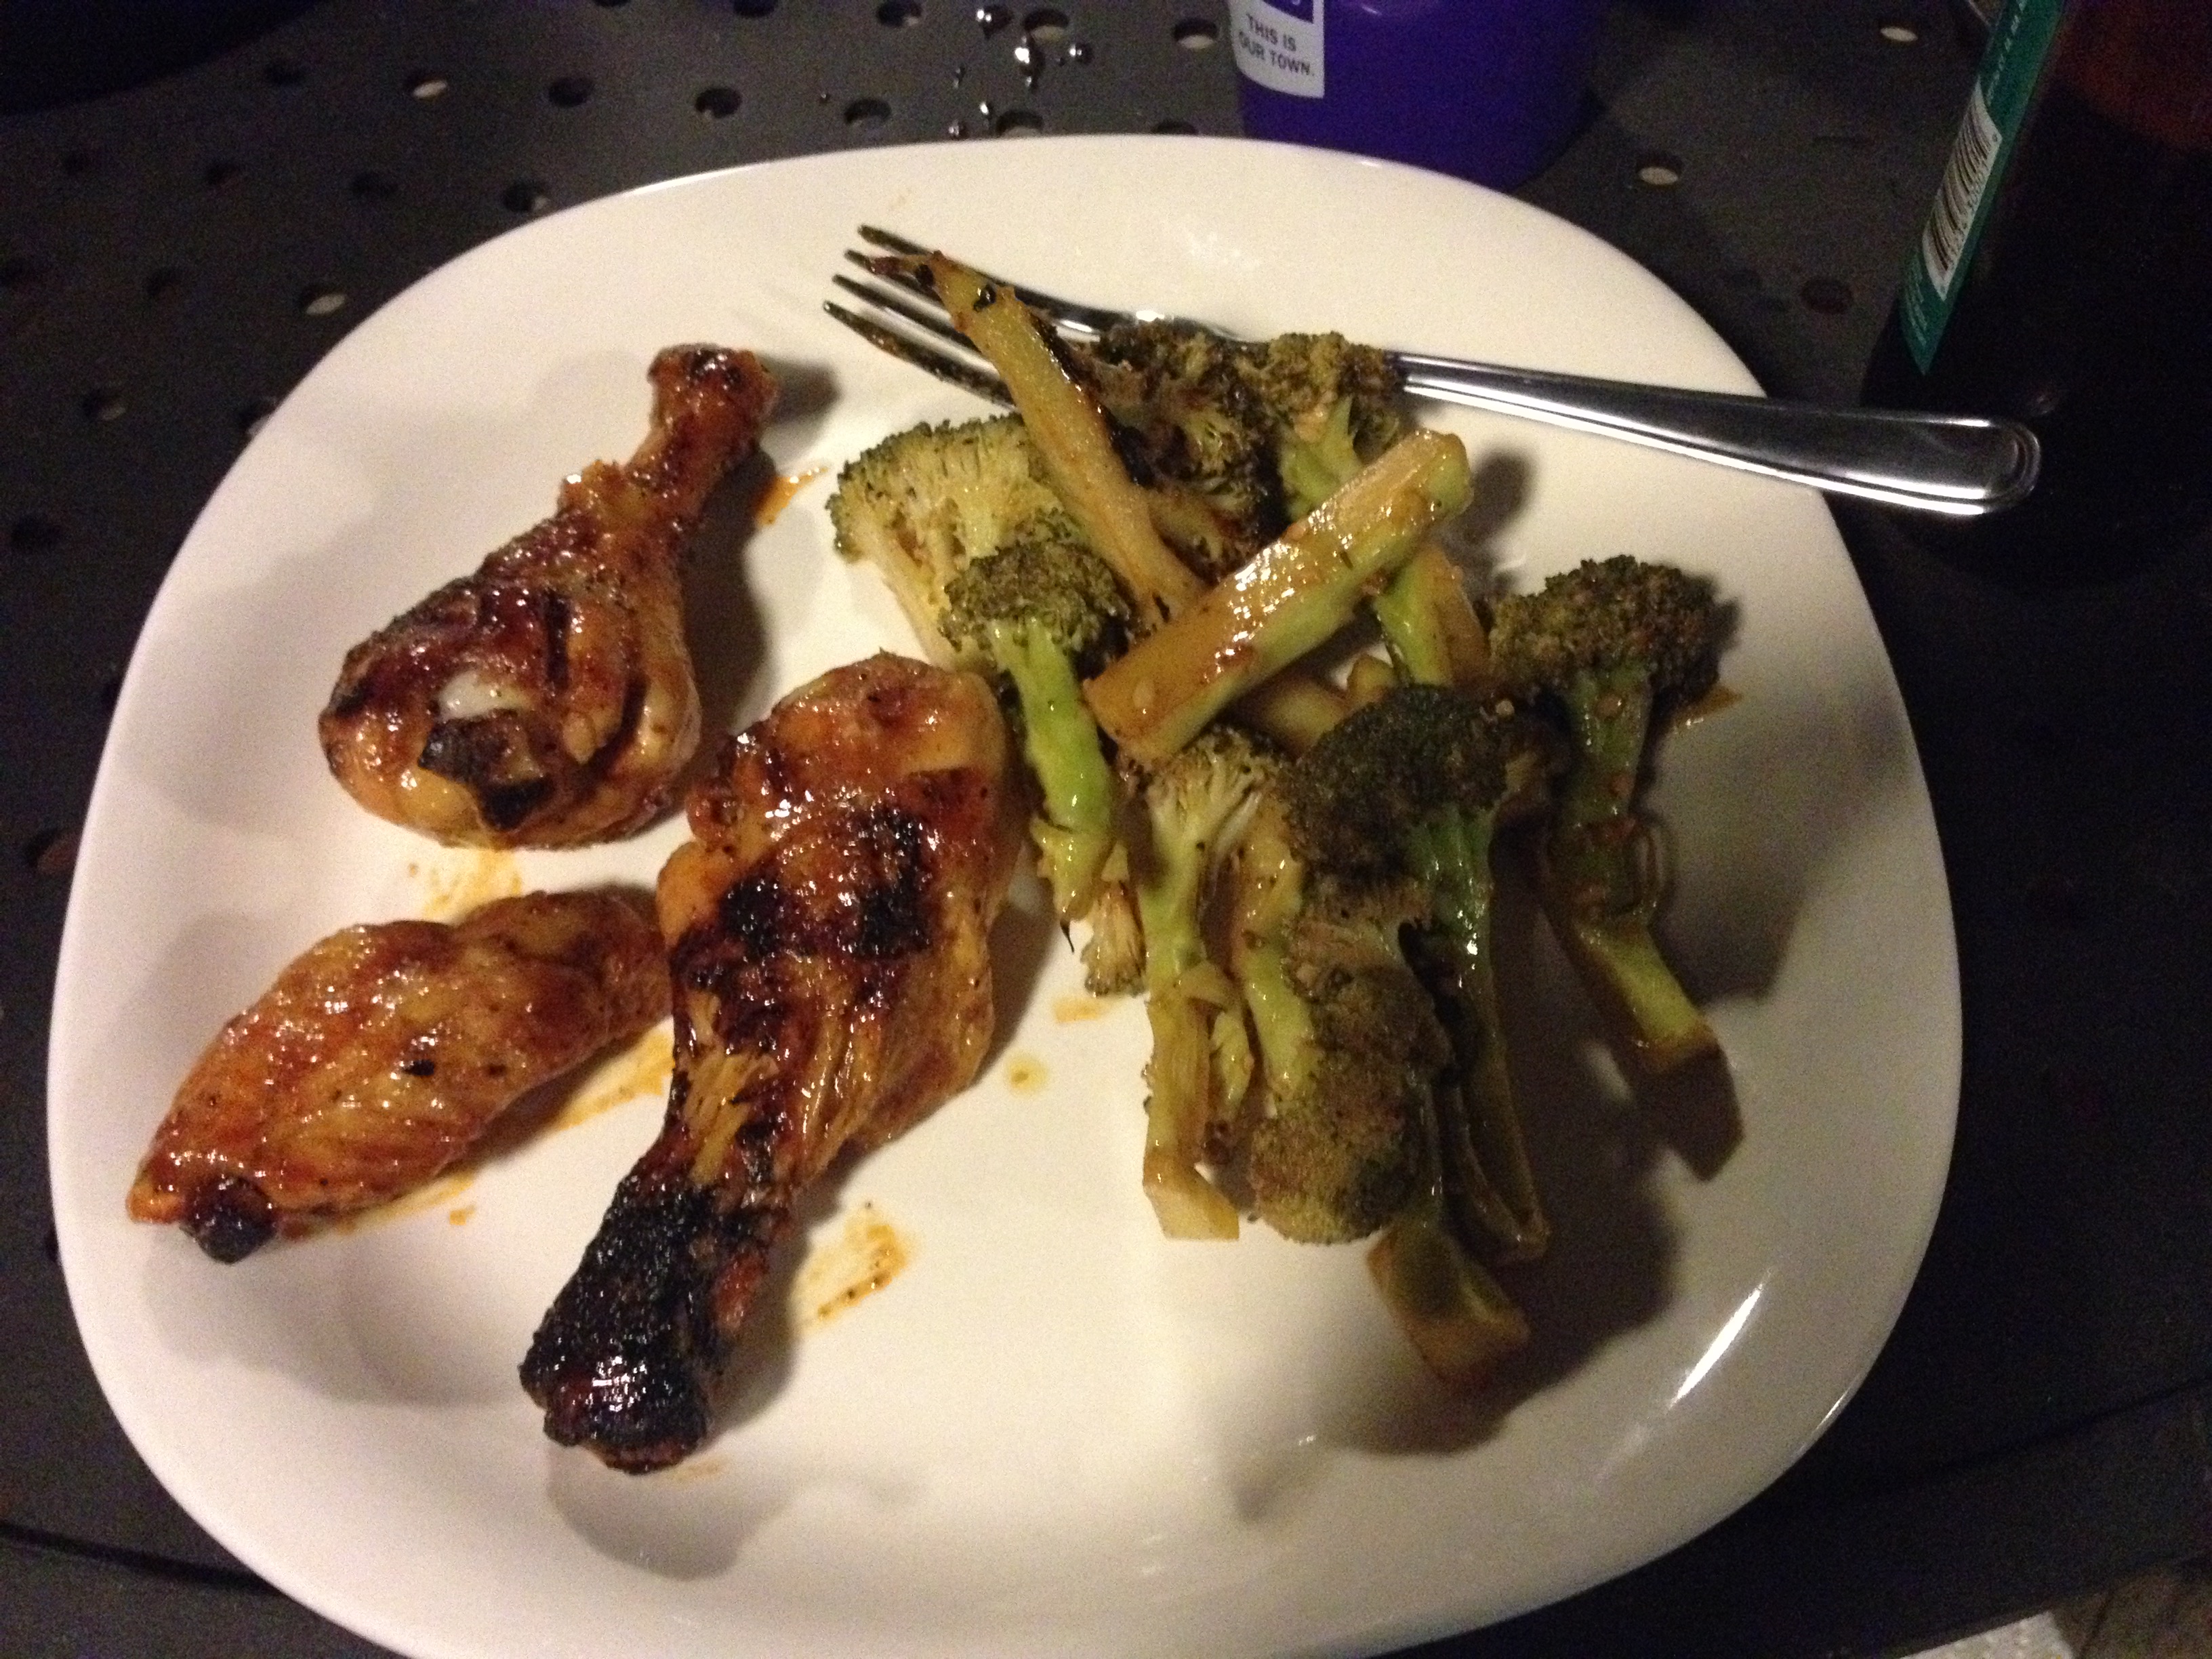
Oh I’ve had my fair share of chicken wings – but the sweet and tangyness of these combined with the slight grill char were SO ON PAR for an evening that I’d describe as fall clinging on to a past relationship that is summer (i.e. we are ready for fall food, but it’s kind of still hot in Atlanta). I have to say thank you to my friend Mike for teaching me how to make chicken wings and for prepping this whole meal! If you are low on dollars and low on time, I’d highly suggest this meal! The chicken only took around twenty minutes on the grill, and the marinade for the garlic should only take the day to absorb flavors.

So I’m actually talking from the perspective of Mike considering I did very little work here – but I’d love to transfer knowledge over to any of you all who are also first time wings grillers so I’ll share from my perspective.

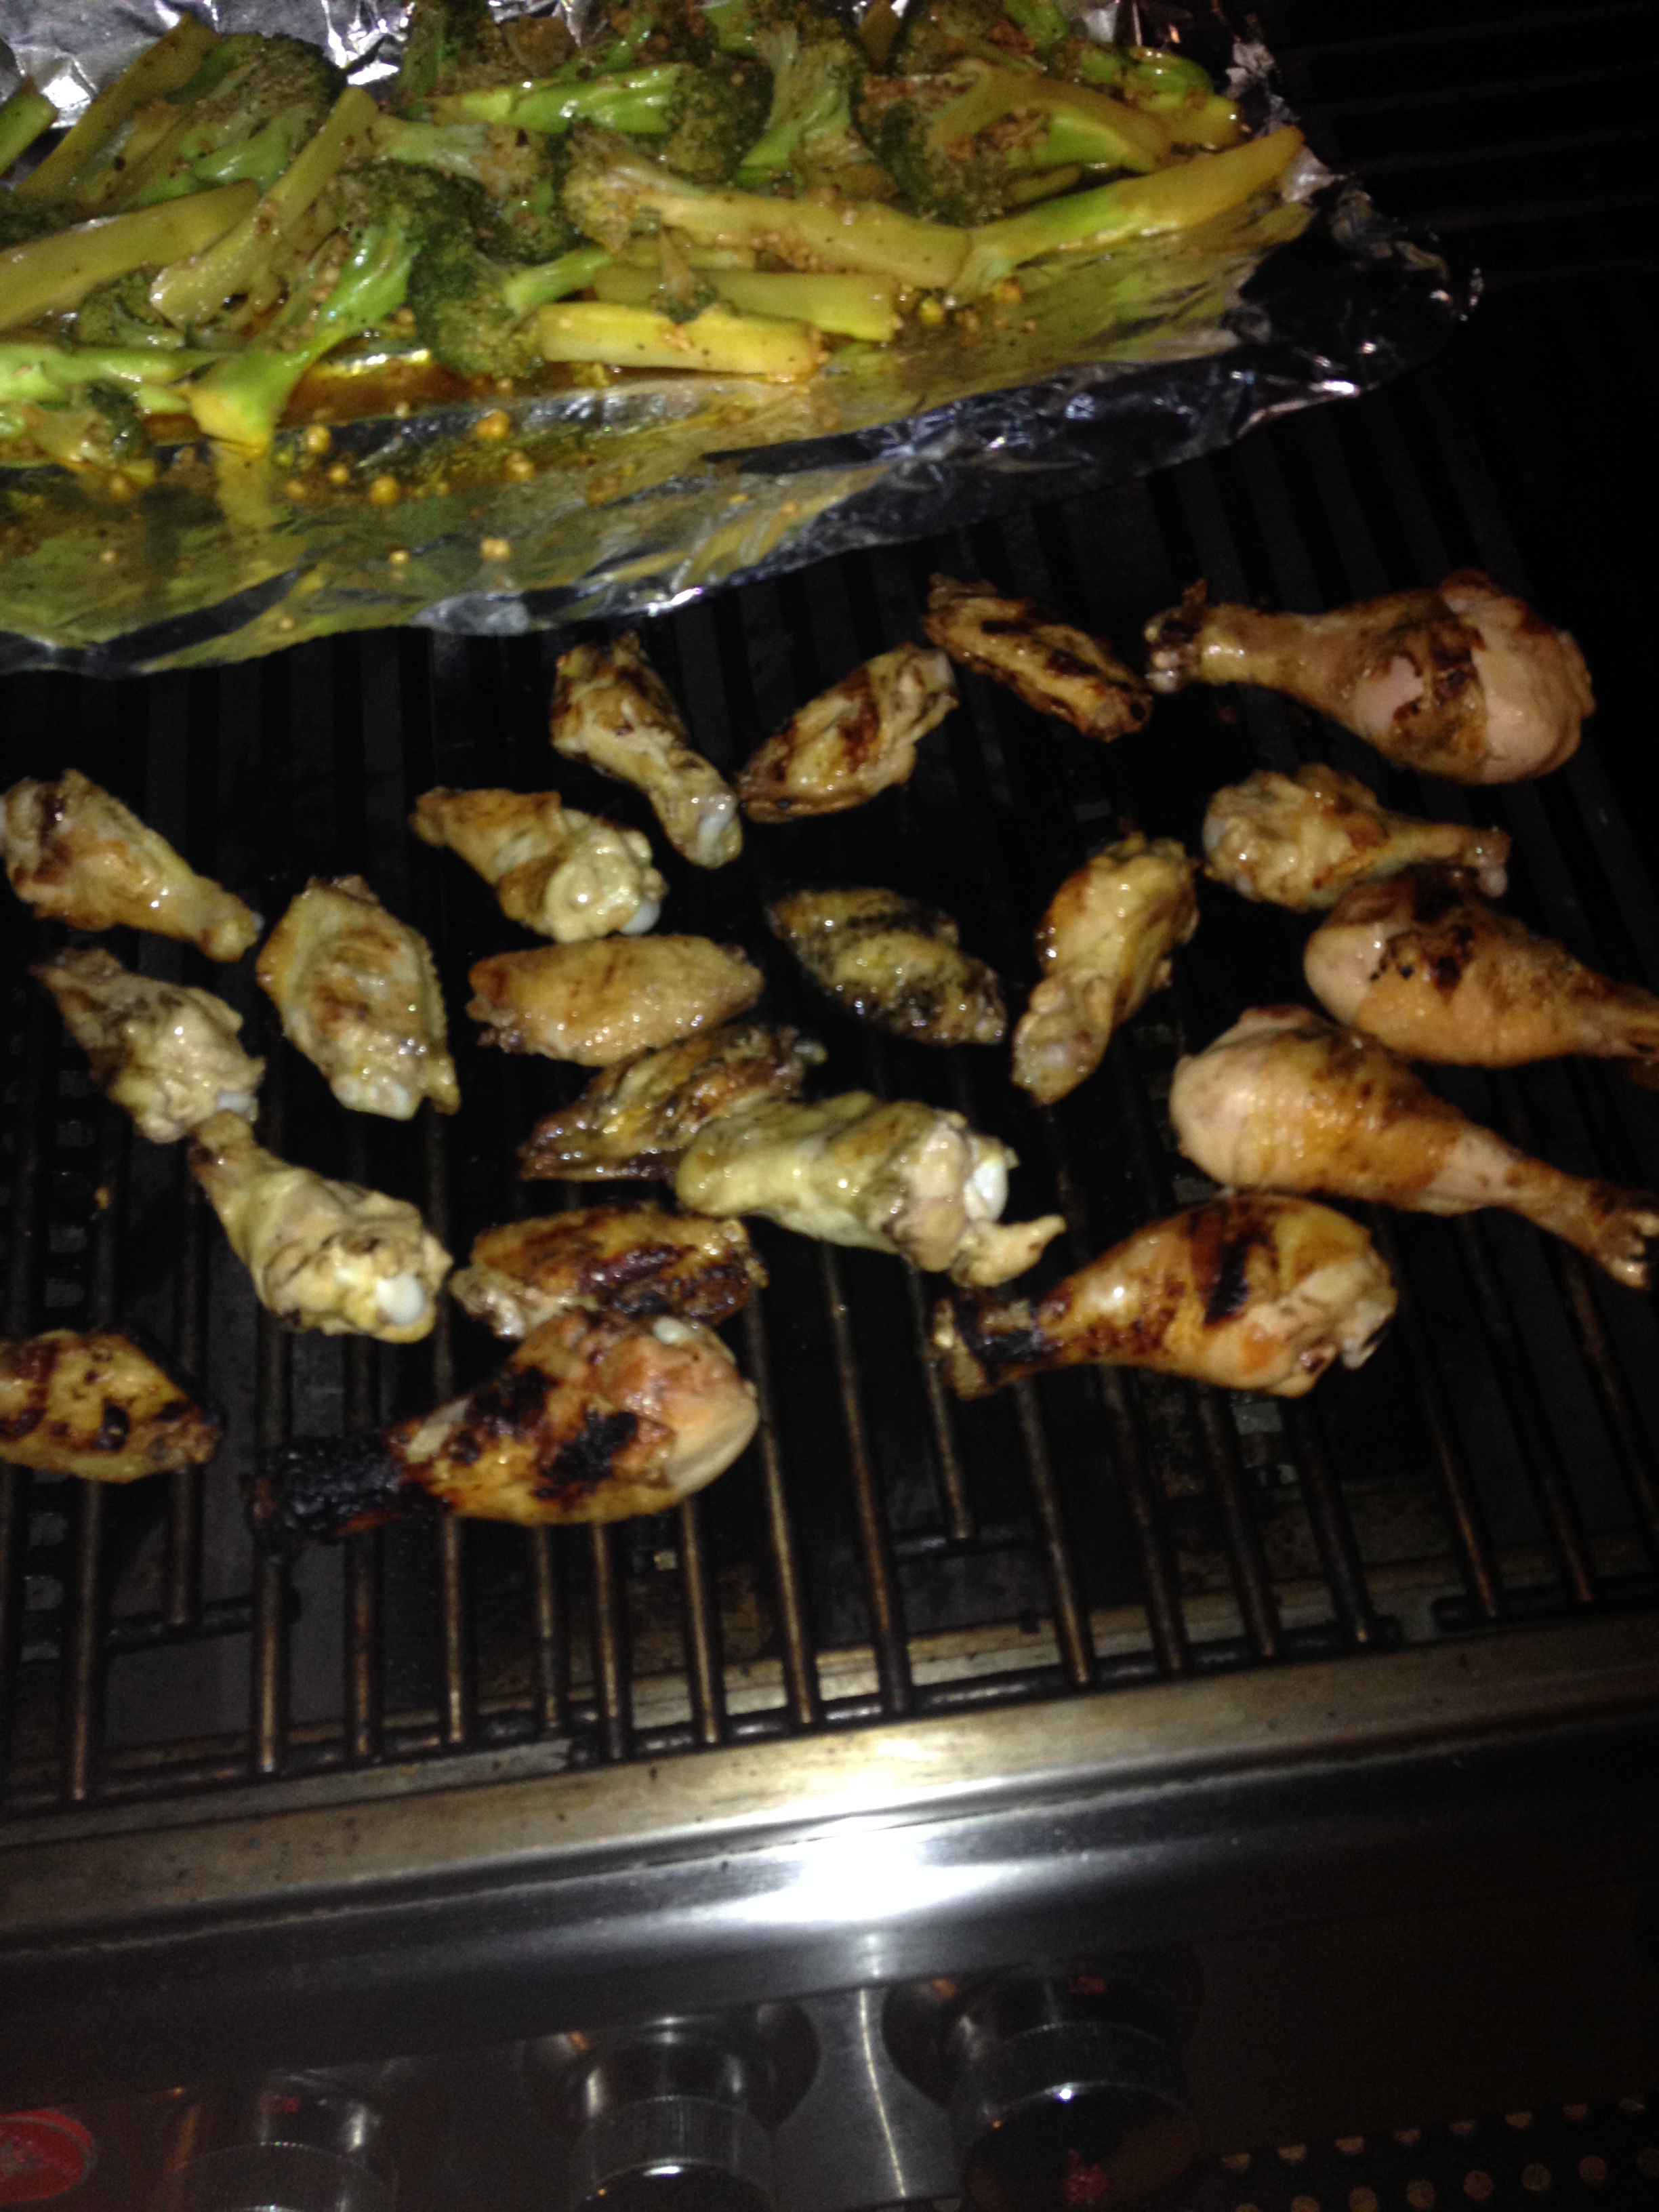
The chicken did not have any marinade. I didn’t know this about wings! All you really have to do is cook the wings on their own (skin on) and then add the sauce in at the end. WHABAM – deliciousness. For some reason I feel very cartoonish about wings, like they should have some kitschy thought bubble that speaks with Emeril Lagasse’s voice saying “Bam!”

2014-10-09 20.11.42

Anyways, so Mike was kind enough to cut the wing tips off the wings for us before we cooked and had prepped the sauce for the Honey Sriracha Wings. This is literally all we did:

Prepped the grill – make sure to take your time to let it heat up medium/medium high heat. Mike had already prepped the sauce so we just put it on low on a burner to keep the sauce warm. If you hadn’t prepped in advance, make sauce. Add the chicken wings onto the grill, rotating every 2 minutes or so to evenly cook them. After about 20-25 minutes, wings were about done and we tossed them in the sauce and voila! a carnivorous meal. 2014-10-09 20.11.48

This is the recipe for the Neely’s Spenser’s Grilled Broccoli. The great thing about something like this is  you can really use whatever kind of vinegar you have on hand or dry rub. I think Mike has his own dry rub that he likes to use for grilling and had red wine instead of white wine vinegar. All the power to ya to use your fave flavor. I really think the only thing you need to nail here is 1) not overcooking the broccoli and 2) adding garlic.

You want to blanch the broccoli so that it just barely cooks. That way, when you add it to the grill, it won’t take very long to cook but will get a nice smoky grill flavor. So, if you think once you’ve blanched the broccoli it still looks raw – that’s actually a good thing. Mike marinated this for the day I think? and we simply put it on some aluminum foil on the grill about 5 minutes before the chicken were done cooking.

2014-10-09 20.43.32

2014-10-09 20.26.10image

Make this please!! And put your feet up, relax, and drink some Sweetwater 420 like we did to celebrate the fact that it’s a Thursday night and you just grilled chicken wings and managed to complete a long jog with the maniac that is Mike Kerrigan. Woo!2014-10-09 20.58.07

Chinese Pulled Pork and Goodbye to summer

Standard

2014-09-13 20.13.46

What are you happy about today? I am happy for my family’s health, the existence of music (good and bad included I guess), and this barbeque I had on Saturday. My roommate put it perfectly: this is one of those times where Katie wants to make something, so she asks people to come over and try it. It’s less that I’m good at entertaining and more that when people smell food, they flock like sheep. Is that a phrase?

I was so excited to eat real food after a week of recovering from wisdom teeth surgery. While I didn’t let it stop me from nomming hard, it did stink not being able to chew. Poor me, I got to try Zesto milkshakes for the first time and had a banana pudding milkshake that rocked my world.

I recently visited the Dekalb Farmers Market in Atlanta and had a love affair I think. It was one of those lazy Sundays when I wanted to get lost somewhere and found myself purchasing a 4 pound pork BUTT for no reason in particular. I tried to ask the butcher what people usually get for BBQ and he was all “girl  you’re on your OWN.” After being shuffled through the baking aisle by some intense bakers and drooling over bags of the coolest whole spices you’ve ever seen, I went on my way with my big ole pork butt.

One week later, I found myself declaring “I’m making this pork butt TODAY”. And no, I don’t think I even thought about who’d eat it other than myself, but it was eaten! I started my pulled pork experience with an Asian recipe and found success!

It wasn’t too bad! The reviews from this recipe made it seem very versatile and easy to play around with. The recipe only calls for 2.5 lbs of meat, and I used 4 without changing the proportions too much. The recipe says to cook this pork on the stove, but I ended up doing a combo of stove and crock-pot

With this pork, we served Cookie and Kate’s peanut sesame noodle slaw and had TOO MUCH FUN using our new food processor. Then we sort of strayed away from Asian and served a good-bye summer panzanella salad. We tried to come up with some unique names for the dishes so that they could be dubbed as Katie and Christine’s special recipes, but the only thing suggested was Jamarcus and Chastity’s pulled pork. No good.

I’m smiling now, thinking of my friends hunched around our teeny porch nomming on pulled pork. Love it! My weekend ended with the most beautiful singing from the church choir at this new church I’ve been going to. One of those moments when you get all goosebumpy, don’t you love that?! Put me in a great mood.

Chinese Pulled Pork, adapted slightly from this food52 recipe

4 lb Boston butt, pork butt

2 tbs olive oil

1 small onion, peeled and sliced thin

3 slices of .5 inch thick ginger, peeled

3 cloves garlic, peeled and chopped roughly

1 piece star anise

1/4 cup dried shitake mushrooms (I couldnt find presliced so just broke them up in my hands)

1/2 cup soy sauce

1/3 cup white wine

1 cup low sodium chicken stock

2 tbs rice wine vinegar

1 tsp sesame oil

1. Take a paper towel and make sure your pork is dry before you start cooking it. This’ll help it get a good sear in the pan. Get out a big dutch oven. Cut the pork into large chunks, doesnt have to be fancy bc it’s going to fall apart

2. Heat the oil on medium high heat and start to brown the meat in batches. You don’t want to put too much in all at once bc you really want a good crisp on the outside of the pork. Just brown the pieces on 2 sides, doesn’t have to be the whole cube

2014-09-13 13.22.05 HDR

2014-09-13 13.39.16

3. After each batch is done, set the pork aside on a separate plate. After you finish all the pork, add the onion, garlic, and ginger (pork should be out of the pan) and saute on medium heat until the onions are sweating and the flavors are fragrant, scraping up the brown parts on the bottom of the pan. (says 5-8 minutes mine was closer to 5)

2014-09-13 13.56.20

4. Add the star anise and mushrooms for just a minute to get them sweating. Then add your pork back to the pan and mix with the sauteed onions/garlic/etc. Add in the soy sauce, white wine, stock, rice vinegar, and sesame oil. Bring the mixture to a boil, then reduce to very low heat. If you’re on a high burner, put the pot on the smallest burner. Keep it at a gentle, moderate simmer (I found this hard to keep steady so had to come back and check periodically) for 2 hours.

2014-09-13 13.58.51 HDR

2014-09-13 14.16.32 HDR

5. After two hours, skim the excess fat and shred the pork. Discard the star anise pod and cook the sauce down. At this point I put some of the sauce and the shredded pork in the crockpot and cooked it on low for another 2 hours.

Serve on potato buns with slaw or the reduced sauce! bon appetit!

Peanut Butter Cookie Toasted Oatmeal Ice Cream Sandwiches

Standard

2014-08-09 14.23.31 HDR-1

Is it strange that I absolutely love the good ole staycation? Otherwise known as didn’t choose a place to drive/fly to/ didnt want to pack clothes for more than five days in a carry on/ needed to detox from deep dish pizza and gelato. Well, all of those might be true except the last one. I don’t think making homemade ice cream is detox from gelato.

I was in Chicago exploring for the first time as an adult and had an absolute blast! Let me tell you the wonderful things I ate: Asian tacos, deep-dish pizza at Lou Malnati’s, BLUEBERRY FRENCH TOAST GELATO from Black Dog Gelato, really rich chocolate mousse, an entire SLAB of pork belly on a girl date with my biffle Cessie, and a delicious drink with Pisco, St. Germain, basil, lime and some soda-y thing. It was a wonderful trip!

Immediately after returning home, I sniffed out a good ice cream recipe: toasted oatmeal!!!! Ahhh this was my second ice cream adventure this summer and my first attempt without a mixer. I’ve made a few fruit ice creams for my dad, but when it’s just for me, I want chocolatey/coffee/peanut buttery/banana/caramely flavors. And if you can’t tell, I like breakfast!!

My roommate and I were so curious as to how toasted oatmeal could even have that potent of a flavor. Like, would this turn out to be just a cream base with a few traces of grains floating around?? The flavor is definitely breakfast-y, but I’d like to say it’s sort of like a scoop of butter pecan. The touch of cinnamon and nutmeg is subtle, and I think the toasting of the oatmeal really takes this ice cream to the next level.

So I based this recipe almost exactly off of this one from thefauxmartha. I say almost exactly because I tried to but was so excited, I accidentally switched the proportions for heavy cream and half and half. The cookie recipe was very simple and I tried making the ice cream sandwiches with both a chewy version of this cookie and a crunch version.

Oatmeal
1 tbsp. unsalted butter
3/4 c. old fashioned oats
heavy pinch of salt
dash of cinnamon
3/4 c. liquid (1 part milk/3 parts water)

Ice Cream
2 c. cream
1 1/2 c. whole milk
1 c. half and half
1/2 c. sugar
1/2 c. brown sugar, lightly packed
1 tsp. flaky kosher salt
3 egg yolks

Find the peanut butter cookie recipe here

1. Prepare oatmeal: Melt the butter in a skillet or small saucepan, add oats and toast until it sort of smells like browned butter…aka a bit of a nutty flavor. The recipe says about 4 minutes, took more like 5-6 for me. After toasted, pour out the oats. Sprinkle a pinch of salt, a LARGE dash of cinnamon and a small pinch of nutmeg if you’d like. Add liquid and bring to a simmer. Add in oats and stir quickly to make the mixture evenly mixed. Remove from the heat and set aside for about 8 minutes to let the oats absorb.

2014-08-07 17.12.26

2014-08-07 17.23.55 HDR

2. Make ice cream: Ok, guys. Man your stations, here. You’ve really got to move gracefully through the kitchen during this time. Even when you’re trying to improve your roommate’s parents with your ladylikeness. While hot dairy products are flying all over the kitchen. 

BACK TO BUSINESS sorry….Add your milk, half and half, and cream to a heavy saucepan with the sugar and salt and stir to dissolve sugar. While this is heating, get your egg yolks ready. Whisk the egg yolks until pale yellow and frothy in a small bowl.

2014-08-07 17.33.52 HDR

3. Once the cream mixture is simmering (really a pleasant thing, right? hot milk?), slowly temper your eggs. Do this by ladling about a half cup of the hot mixture slowly into the eggs, whisking quickly to mix the two. Once you’ve quickly whisked together the hot milk into the eggs, add the egg milk mixture into the pot and whisk constantly to temper. The recipe said to just whisk until it thickens, but I couldn’t really tell it was thickened, so I’m going to tell you to whisk for about 6 minutes at a low simmer. Then remove from heat.

4. Add your cooked oats to the cream mixture off the heat and let steep for 30-60 minutes (covered)

5. Get your strainer ready over a big bowl. I used a pasta colander. Use a fine mesh sieve if you have one. After the mixture has finished steeping, strain the mixture, using a spatula to press the mixture through the sieve.

6. Cool the ice cream base in the refrigerator until cool. Then prepare in your ice cream maker according to its instructions.

2014-08-08 12.01.17 HDR-1

2014-08-08 12.04.09

7. Make your cookies!!!! Here’s how we made the sandwiches: Start scraping your ice cream with a spoon into a small ball – then place on the bottom of one cookie. Use the bottom of another cookie to smush the cookie together. Scream at the top of your lungs before eating this because you are so excited. I dunno it just sounds fun.

2014-08-08 18.54.50

2014-08-08 18.55.52

2014-08-08 19.07.10 HDR

Tell me, are you a crunchy or chewy cookie person?!?! Any recommendations on other ice cream sandwich combos?? 

Banana Trail Mix Muffins

Standard

2014-07-20 14.35.04

Have you ever used coconut oil before? This was my first time baking with this lovely substance and it added an AMAZING richness to these muffins. It was a Sunday afternoon, my room was messy, and it was raining. My brain was of course focused on baking. My little teeny kitchen is really not prepared for the amount of mix-ins this recipe calls for, but the mix-ins MAKE the recipe. I’m all about a trail-mix cookie, a blondie with a ton of added crunch, and have been waiting for the day when I make a trail mix sandwich.

The other day our intern at work threw out one of those big Kirkland merchandise bags of trail mix and I thought he was crazy (even after finding out the bag was expired :/). I can guarantee the mix-ins in these pics are NOT expired, for the record. So I was lucky enough to have a taste tester come by to verify that in fact, these WERE good.

I’m a huge fan of cookie+kate and lately have turned to her for more than just recipes. She has some great articles on her site about a whole variety of food topics and lately about cooking tools (I’m totally a drooler over that section). I’ve been wanting to make this recipe for awhile but realized I didn’t have a loaf pan at the last minute! Never fear, the muffin tin always saves the day.

Let me give you some very specific instructions on an appropriate occasion to eat these muffins in case hunger isn’t enough of a good reasons. You need to sit on a very comfy couch with a close friend and catch up on life. You may also need some Norah Jones playing in the background, a rainy backdrop and an open afternoon. On the other hand, they’d make a very appropriate snack for a camping trip. Similar, right?

Let’s bake.

Banana Trail Mix muffins, adapted very very slightly from cookie and kate

3/4 white wheat flour

1/2 cup oats

1 1/2 tsp baking powder

1/4 tsp table salt

1/2 tsp cinnamon

1/8-1/4 tsp nutmeg

3/4 cup unsweetened coconut

1/4 cup dried currants

1/4 cup chopped chocolate (I used a Hershey’s bar with almonds)

1/2 cup almonds and walnuts mixed, chopped

1 cup mashed ripe bananas (this was about 2 bananas for me)

1/2 cup honey

1 large egg, room temperature

1/2 cup melted coconut oil

1. Set the oven to 375 and line your muffin tins with wrappers or grease them.

2. Mix the dry ingredients together in a large bowl: flour, oats, baking powder, salt, cinnamon and nutmeg

3. Then toss in your dried fruit, coconut, choco chips or chopped dark chocolate

4. In a separate bowl, whisk together the honey, melted coconut oil, vanilla, egg, and mashed banana until smooth. Pour the wet mixture into the dry and gently fold them together.

5. Scoop the batter into your muffin tins about 2/3 of the way full. Bake muffins for around 18-25 minutes depending on your oven, until the sides are just browning and the tops look just firm. Test by using a knife or toothpick, inserting it in the center of the muffins. If it comes out dry, they’re ready.


Serve these warm or cold as a sort of trail mix-y mid-day snack. Or five of them make a snack if you are a certain friend of mine who came over to taste test….I am SO excited about this recipe you guys, please make it! These are super moist yet packed with crunch as well. Who has other ideas for fun snacks/desserts turned into muffins??

I’m off to Chicago this weekend friends – any recommendations?

2014-07-20 13.45.50

2014-07-20 13.47.54

2014-07-20 13.51.44 HDR

2014-07-20 13.58.21


2014-07-20 14.06.05 HDR

2014-07-20 14.22.06 HDR


Mediterranean 7-layer Dip

Standard

2014-06-21 16.53.19

Thank you thank you @annies-eats for this recipe! I went to a friend’s house on a lake last weekend and promised to bring a dip along. I haven’t made any dips in a while and wanted to try out something cold since Atlanta summer isn’t the best environment for hot buffalo chicken dip. Also – this could be a dairy free dip if you want to eliminate the feta.

In my family, we LOVE a Mexican 7-layer dip, so if you’re one of those people who likes a big mound of dip on your chip, tune in! This is pretty versatile too – you could really add a variety of different veggies – bell peppers, small chopped broccoli, some whole chickpeas or roasted chickpeas, etc.

I cheated a bit and used store bought hummus, but I think the homemade pesto and fresh veggies make up for it. I think I’ll be bringing this recipe back for the 4th of July weekend and hopefully trying some different variations. Anyone think there’s some way to make a Chinese 7-layer dip? Penny for your thoughts.

Mediterranean 7-layer dip, adapted from Annie’s Eats

Cilantro pesto:

1 1/2 cups fresh cilantro (I used stems and leaves)

2 cloves garlic, roughly chopped

1/3 cup extra virgin olive oil, divided

4 TBS walnuts

1/4 cup crumbled feta

Dip:

3/4 of an English cucumber, diced

half of a red onion, diced

banana peppers, chopped in half

kalamata olives, sliced

julienned sundried tomatoes (I think you could also used diced cherry tomatoes)

crumbled feta cheese (about 1/2-3/4 cup)

1. Make the cilantro pesto: Add the garlic, cilantro, walnuts, some fresh cracked pepper, and 2 TBS olive oil to the bowl of a small food processor. Pulse until not quite a paste, but everything is mixed evenly. Then, slowly drizzle in your olive oil. I didn’t end up needing the whole 1/3 of a cup, but I do like my pesto thicker. After you’ve finished pulsing, mix in your feta (don’t pulse in the food processor, just slowly mix into the mixture)

2014-06-21 16.40.08 HDR

2. Assemble! I used two different kinds of hummus so I spread them both together in the bottom of a pie plate. After the hummus, add your cilantro pesto in the middle and spread out in an even layer. Then add your toppings! Cukes, red onion, pepps, olives, tomatoes, and you can either end with the feta or add it in batches.

2014-06-21 16.39.56

2014-06-21 16.40.57 HDR (1)

2014-06-21 16.48.05 HDR

2014-06-21 16.52.57

2014-06-21 16.53.06 HDR